
Raspberry Pi could be use as a desktop replacement. If it happens that you don’t have a desktop or laptop you can use your Raspberry Pi to serve as a print server.
What do you need?
- 1 Raspberry Pi Unit with Raspbian Installed
- 1 USB-based or network-accessible printer
PROCEDURE
In order to enable the printer with your raspberry pi, we need to install CUPS or Common Unix Printing.
At the terminal enter the following command to begin the installation:
# apt-get -y install cups
Add the user pi to the group lpadmin
# usermod -a -G lpadmin pi
Modify the cupsd configuration file:
# nano /etc/cups/cupsd.conf
Inside the file, look for this section:
# Only listen for connections from the local machine
Listen localhost:631
Comment out the “Listen localhost:631” line and replace it with the following:
# Only listen for connections from the local machine
# Listen localhost:631
Port 631
This instructs CUPS to listen for any contact on any networking interface as long as it is directed at port 631.
Scroll further down in the config file until you see the “location” sections. In the block below, we’ve bolded the lines you need to add to the config:
< Location / >
# Restrict access to the server...
Order allow,deny
Allow @local
< /Location >

< Location /admin >
# Restrict access to the admin pages...
Order allow,deny
Allow @local
< /Location >

< Location /admin/conf >
AuthType Default
Require user @SYSTEM

# Restrict access to the configuration files...
Order allow,deny
Allow @local
< /Location >
The addition of the “allow @local” line allows access to CUPS from any computer on your local network. Anytime you make changes to the CUPS configuration file, you’ll need to restart the CUPS server. Do so with the following command:
/etc/init.d/cups restart
After restarting CUPS, you should be able to access the administration panel via any computer on your local network by pointing its web browser at http://[the Pi’s IP or hostname]:631/admin.
Adding a Printer to CUPS:user
Web Interface:

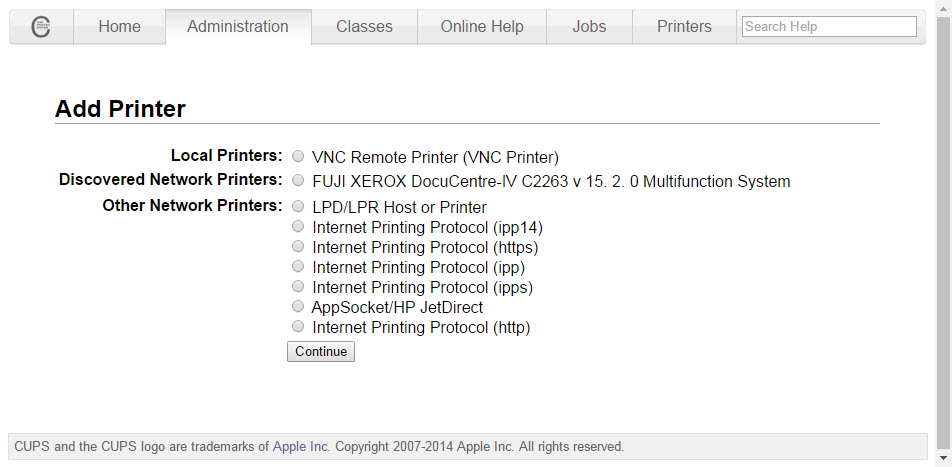
Click on the Administration Tab and add printer as seen on the screenshot below:

Within the Administration panel, click add printer. If you receive a warning about the site’s security certificate, go ahead and click proceed anyway to ignore it. You’ll be prompted to enter a username and password. Please use the following credentials:
username: pi
password: raspberry
Go ahead and login, you’ll be presented with a list of discovered printers (both local and networked). Select the printer you wish to add to the system:
After selecting the printer, you’ll be asked to edit the name, description, and location of the printer, as well as enable network sharing.
Instructions should be easy straight forward so go ahead until you are able to install your printer. Make some print test by writing something in the notepad and print.